If the first method doesn’t help too much, converting GPT to MBR disk can do you a great favor. It is an easier way to fix “The Selected Disk is the GPT Partition Style” error. And you can do it by using Diskpart or EaseUS free partition software. The latter one is a better choice because it allows you to manage this job without deleting partitions or losing data.
Method 1: Convert to MBR using Diskpart
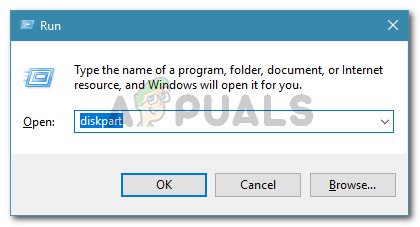
Step 1: Press “Win + R” to open Run dialog > Type: cmd and hit “Enter” to bring up Command Prompt.
Step 2: Type: diskpart.exe and hit “Enter” to open “DiskPart” window.
Step 3: Type: list disk and hit “Enter”.
Step 4: Type: selectdisk g (Replace g with the drive letter or your disk that you want to change it to MBR.)
Step 5: Type: convert MBR and hit “Enter”. Let the program to do the disk conversion task, and then there you’ll get wanted partition table in your disk
Step 6: Type: exit to finish the task.
If The step not workout you try another option :
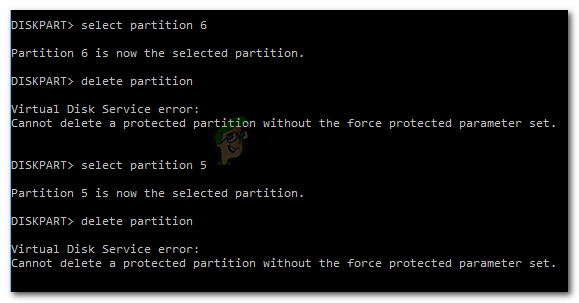
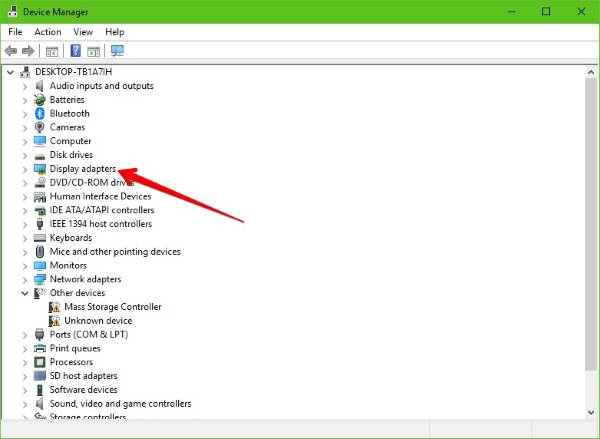
You can’t Delete any partition or volume it shows below the service error No Worry
Try Another way
Resolving the Error Using the override parameter
Most likely, you are seeing this error as a warning that you need to be extra sure that you wish to delete the recovery partition. It’s somewhat confusing because the parameter is not indicated in the Help Delete Partitionsection of DiskPart.
Press Windows key + R to open up a Run dialog box. Then, type “diskpart” and press Enter to open the DiskPart utility. When prompted by the UAC (User Account Control), click Yes to grant administrative privileges.
Identify the disk that you want to work with by typing the following command:
list disk
Select the list that you want to wipe or reformat by using the following command:
select disk X
Note: X is only a placeholder for the actual number of the disk that you’re trying to handle. Please replace the placeholder with the correct number.
Once the proper disk is selected, type the following command to see all the partitions that the selected drive is using
list partition
From the list of partitions, identify the one that you wish to delete and use the following command to select it:
select partition X
With the targeted partition selected, use the following command do signal Windows that you’re sure about the step that you’re about to perform (by using the override parameter):
delete partition override
Once the process completes successfully, type the following command to exit Diskpart:
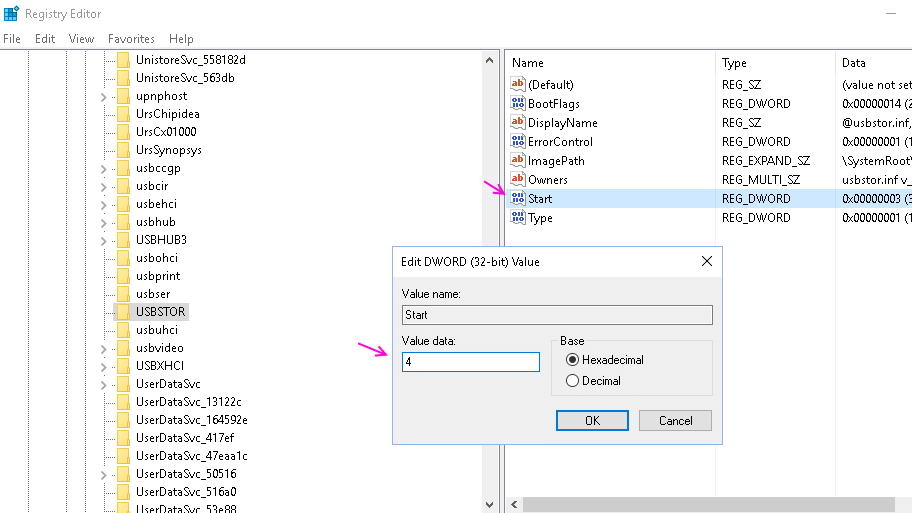
Do You want to protect your data so that no one can take it out from your PC via a pen drive, Then here are steps to block usb ports. You can reenable whenever you want.
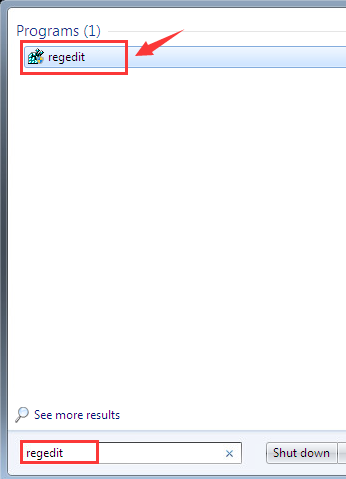
1. In search box search RUN. You can also press windows key + r.
2. Now, type regedit in it to open registry editor.
3. Once it browse to the follwoing location given in next step
4. HKEY_LOCAL_MACHINE\SYSTEM\CurrentControlSet\Services\usbstor
5. In the right area, double click on Start.
6. In the Value Data box, change the value to 4.
7. Finally Click on OK.
8. Close Registry Editor and restart your PC.
9. To re-enable access to your USB ports, enter 3 in the Value Data box in Step 6.
Finally, Restart your computer for the changes to take effect.
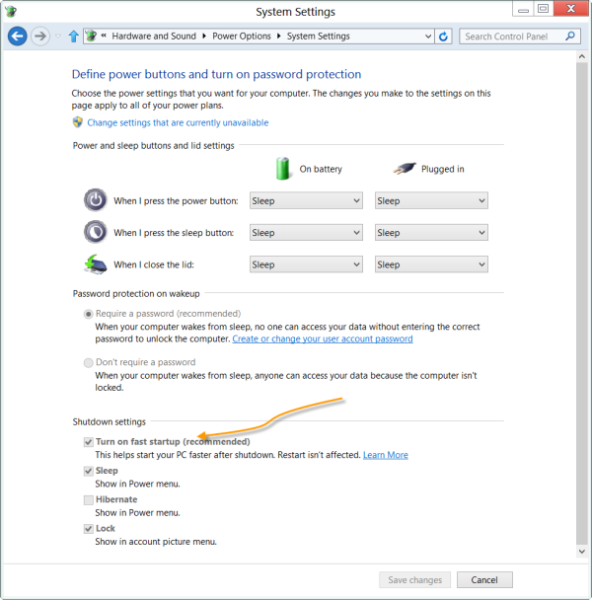
3. Turn off Fast Start-up
Hit the WINKEY + R button combinations, type in Control and hit Enter to launch the Control Panel. Then search for Power Options on the top right search field given to you and find it.
On the left panel, click on Choose what the power buttons do.
On the next page, click on Change settings that are currently unavailable.
Uncheck Turn on Fast Start-up (Recommended). Reboot your computer for the changes to take effect.
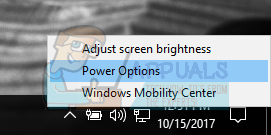
4. Turning off Sleep Mode
Another fix which worked for the majority of the users was disabling sleep mode. The error seems to be related to the computer sleeping or saving predefined data (as in fast startup). We can try disabling the sleep mode completely and check if this fixes the problem. Do note that if this doesn’t make a difference, you can always revert the changes.
Right click on the battery icon present at the bottom right of your screen and click “Power Options”.
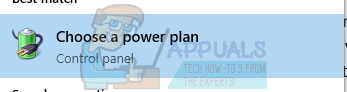
If you own a PC and don’t see this option, press Windows + S and type “choose a power plan”. Click on the most relevant result.
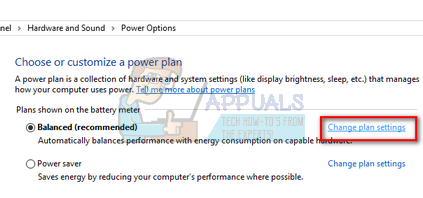
There will be many plans listed in the window. Click on “Change plan settings” in front of the power plan which is currently active on your computer.
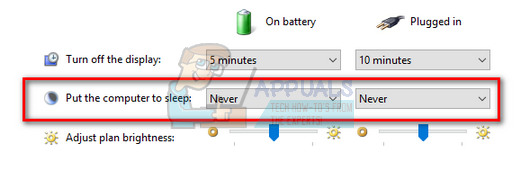
On this window, you will see an option “Put the computer to sleep”. Make sure that the option is set to as “Never” in both conditions (on battery and plugged in). Click “Save changes” and exit.
Now reboot your computer and check if the problem went away.
5. Check for Windows Updates
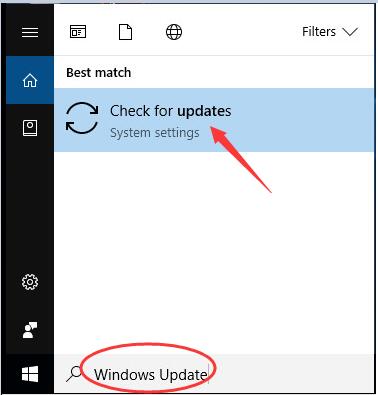
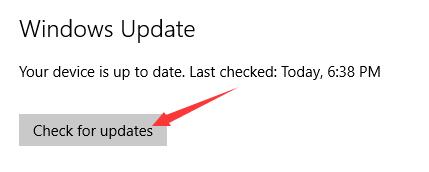
1) Type Windows Update in the search box. Click Check for updates on the top result.
2) Click Check for updates on the right pane of pop-up window.
Go on to follow the on-screen instructions to install the updates.
That’s all there is to it.
Your any comment or feedback is welcomed coming below, thanks.
6. Miscellaneous fixes
You may run the following command in CMD as well:
chkdsk /f /r
You can also try disabling your antivirus program. McAfee Antivirus has majorly been found the culprit in this issue. So, I would really recommend you to uninstall your third-party antivirus program.
To do this, open Control Panel. Click on Uninstall a Program. From the whole populated list your installed software, select your Antivirus program. Right-click on the entry and click on Uninstall. Follow the onscreen prompts.
Reboot your computer for the changes to take effect.
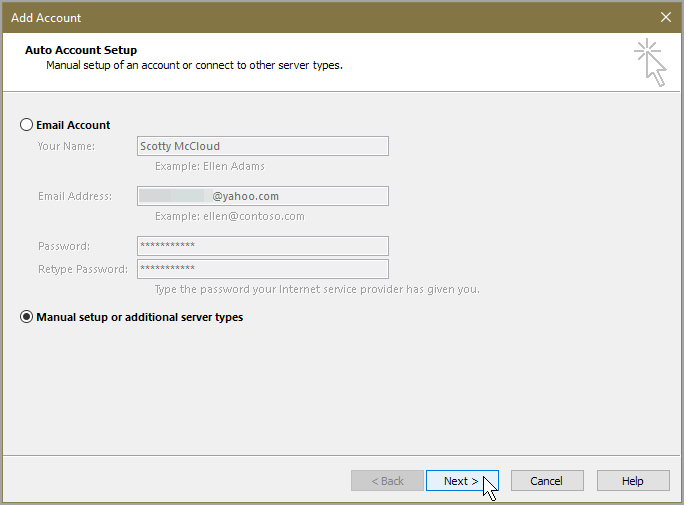
Then, just above the Account Settings button, click Add Account.
Select Manual setup or additional server types.
Then under Choose Service select POP or IMAP.
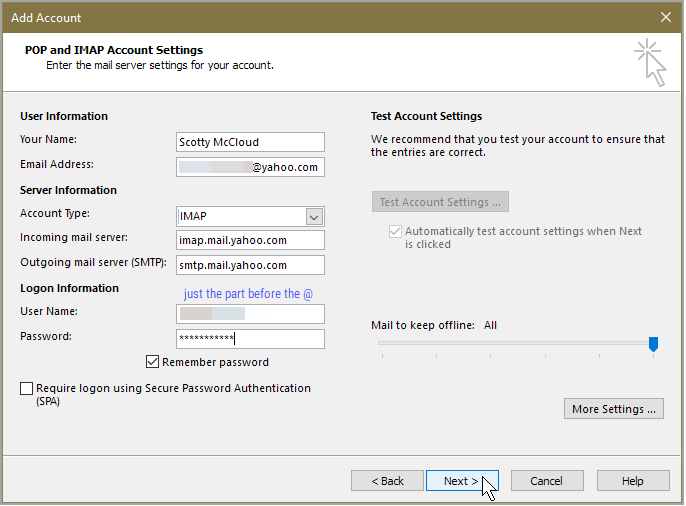
Add your user information and your server information,
Account type: IMAP
Incoming mail server: imap.mail.yahoo.com
Outgoing mail server (SMTP): smtp.mail.yahoo.com
Then add your logon information as shown below.
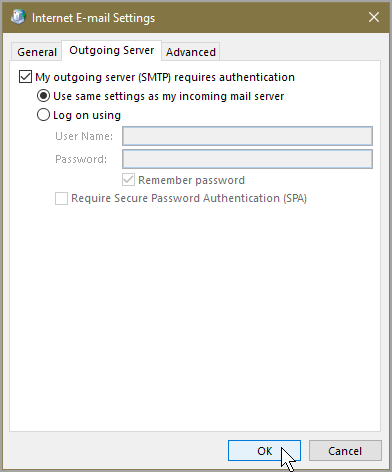
Go to More settings and select the Outgoing server tab.
Check the box next to My outgoing server (SMTP) requires authentication and select the radio button next to Use same settings as my incoming mail server.
In the same window go to the Advanced tab and verify the following.
Incoming server (IMAP): 993 or 143
Incoming server encrypted connection: SSL
Outgoing server (SMTP): 587 or 465
Outgoing server encrypted connection: TLS or Auto
Click OK when finished.
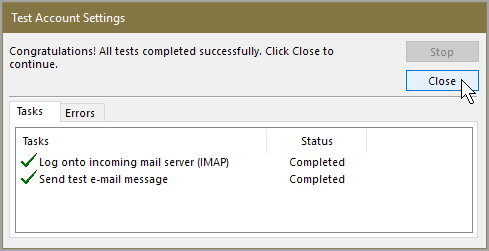
Now click Next.
If you’ve entered everything correctly, both testing tasks will be completed successfully and then you can close that little window and again click Next.
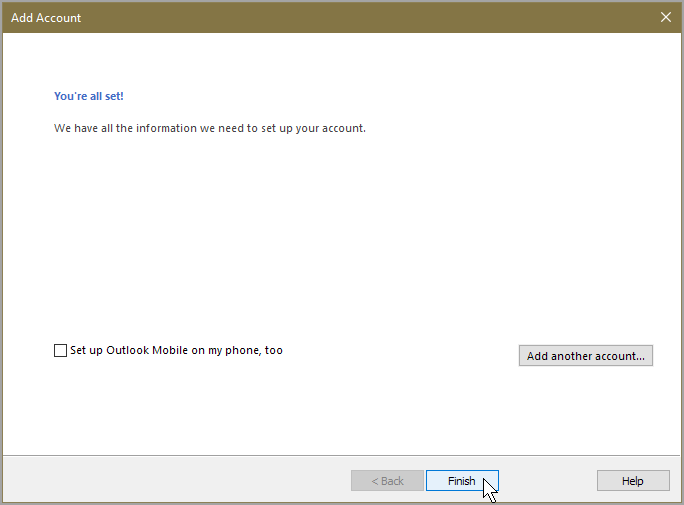
You’ll get a reassuring “You’re all set!” message at this point finally,
Click Finish.
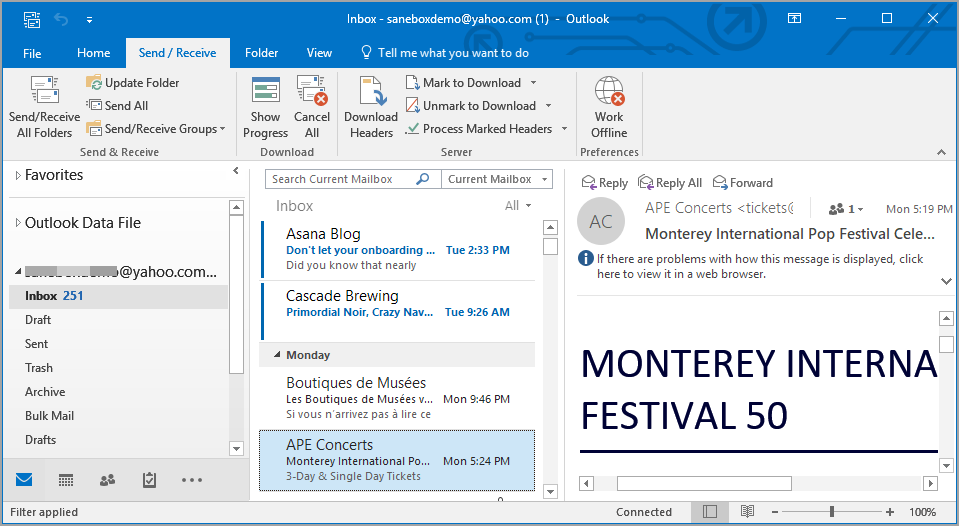
And now you can check your emails through Outlook 2016 with the added power of IMAP.
If you get this message Operation could not be completed(error 0x00000709). Double click the printer name and make sure that the printer is connected to the network when you fail to set your printer as the default one, you’re not alone.
This is an Error Message
Solution
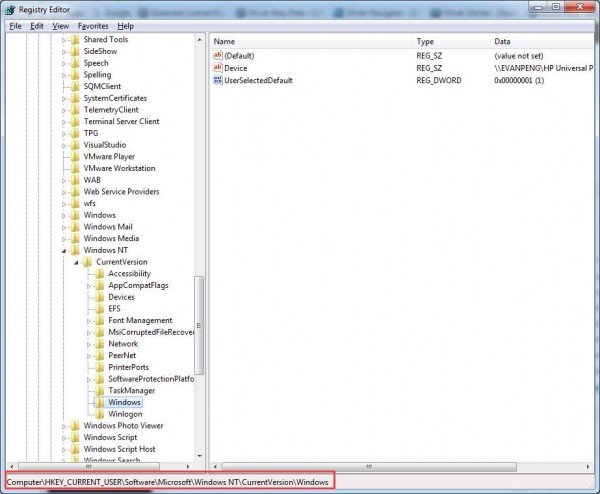
1) Click the Start button, then type regedit and press Enter.
3) Double-click Device. Type in your printer name. (The screen shot here is an example only.)
Click OK to save the change. Note: If you encounter this sort of error “Cannot edit Device: Error writing the value’s new contents“, please follow the steps below to set the permission of the key.
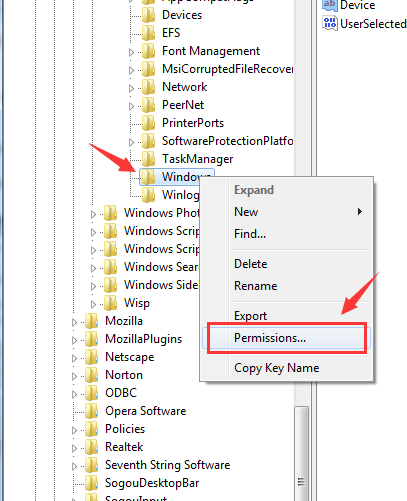
a) Right-click the Windows key on the left side of the panel and then click Permissions….
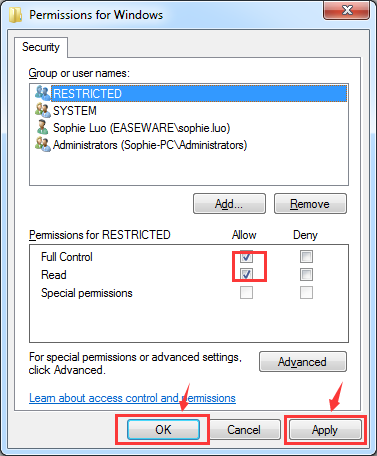
b) Tick the box Allow for Full Control and Read, then click Apply and click OK to save the change.
4) Right-click UserSelectDefault and click Rename to rename it as your printer name.
There you go! You should be able to set up your default printer now!
After setting up your printer, you will need update your printer driver for it to work more smoothly. If you don’t have the time, patience or computer skills to update the printer driver manually.
An error appears when attempting to uninstall the MP Drivers in Windows
Solution
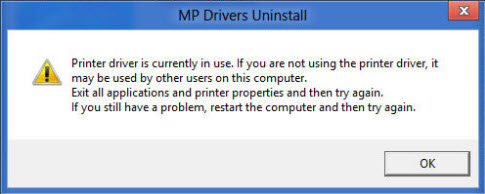
MP Drivers Uninstall
When attempting to uninstall the MP Drivers in Programs and Features, the message ‘Printer driver is currently in use‘ may appear.
Printer driver is currently in use. If you are not using the printer driver, it may be used by other users on this computer. Exit all applications and printer properties and then try again. If you still have a problem, restart the computer and then try again.
Resolution:
Confirm no pending print jobs are queued.
On the computer’s keyboard, press and hold the Windows button. The Windows button can be found between the Control (CTRL) and ALT buttons, just to the left of the space bar.
Now, press the letter ‘R’. The Run window should appear.
In the Open text box, type spool and then click OK. Windows Explorer window should open to the Local Disk (C:)\Windows\System32\spool folder.
Double-click the PRINTERS folder in the larger pane on the right side.
If there is a file in this folder, highlight it. If there are multiple files, you can highlight them all. To highlight one or all files, press and hold the CTRL and letter ‘A’ buttons on the keyboard.
Now, delete the files by holding down the CTRL and letter ‘D’ buttons on the keyboard.
Close the Windows Explorer window.
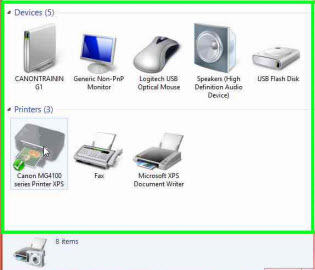
Open Devices and Printers. Click here for instructions to open Devices and Printers.
On Devices and Printers window, click on the driver icon to select it. At the top menu, click Print server properties.
On Print Server Properties window, click Drivers tab.
Under the Name column, find and select the printer driver you want to delete.
Click Remove… button.
On the Remove Driver and Package window, click Remove driver only radio button and then click OK.
When prompted to confirm deletion of the printer driver, click Yes.
Important:
Two printer drivers may have installed. One titled Canon Inkjet XXX series and the other Canon XXX series Printer; where XXX is the model name. Repeat steps 6 through 9 to delete the second driver.
Hint: Two printer drivers will appear if the printer is connected to an access point that has Internet access.
Once the printer driver is deleted, close the Print Server Properties and Devices and Printers windows.
Important:
If the following message appears trying to delete one of the printer drivers, confirm the icon is still selected (highlighted) in Devices and Printers and then click Remove device button from the top menu.
Message: Unable to remove Canon XXX series Printer, x86, Type 3 – User Mode driver. The specifiied printer driver is currently in use.
The Programs and Features window should still be open. If it’s not open, click here for instructions to open it.
Now attempt to uninstall the MP Drivers from Programs and Features.