rdp error like “CredSSP Encryption Oracle Remediation”

Use the group policy settings changes described below to rollback the changes to ‘Vulnerable’ state to allow RDP access.

1. Open Group Policy Editor, by executing gpedit.msc

2. Policy path: Computer Configuration -> Administrative Templates -> System -> Credentials Delegation

Run gpedit.msc and expand Administrative Templates

Expand Credential Delegation

Edit Encryption Oracle Remediation

Select Enabled and change Production Level to Vulnerable

Run the command gpupdate /force to apply group policy settings.

Your remote desktop connection will be working fine now.

Thank you hope it will work well

Windows 10 Error 0x800F0954 Installing .NET Framework 3.5

When you attempt to install .NET Framework 3.5 or any other optional feature using “Windows Features” (optionalfeatures.exe) dialog or using DISM command-line, error 0x800F0954 may popup.

After enabling .NET Framework 3.5 and clicking OK, the following error may appear:

Windows couldn’t complete the requested changes.

The changes couldn’t be completed. Please reboot your computer and try again.

Error code: 0x800F0954

Step 1: Bypass WSUS to Install Features/Updates Directly from Windows Update

To fix the problem, temporarily bypass WSUS server using the following registry edit (requires administrator privileges).

  1. Right-click Start, and click Run
  2. Type regedit.exe and click OK
  3. Go to the following registry key
HKEY_LOCAL_MACHINE\SOFTWARE\Policies\Microsoft\Windows\WindowsUpdate\AU
  1. In the right-pane, if the value named UseWUServer exists, set its data to 0
  2. Exit the Registry Editor
  3. Restart Windows.

See if you’re able to install .Net Framework 3.5 or any optional features now. In most cases, the above steps should fix the problem.

Incase Can’t work this method try another option

Method : 2

1. Download the Windows 10 ISO.

(NOTE– While downloading the don’t forget to match the build no of the ISO with your Windows 10  on your computer.)

2. Now mount the ISO by double-clicking on it.

3.  Remember the drive letter name ( like “G:”/”H:” etc).

4. Now, you have to press Windows key+R to launch the Run.

5. When you can see the Run window, you will need to type “cmd” in that Run window and click on “OK“.

Now copy-paste this command on your Command prompt window, and hit Enter.

dism /online /enable-feature /featurename:NetFX3 /Source:H:\sources\sxs /LimitAccess

NOTE– You will need to change the drive letter in the command according to the drive letter where you have loaded the DVD.

dism /online /enable-feature /featurename:NetFX3 /Source:G:\sources\sxs /LimitAccess

Hope it will Working Fine

Thank you……………………………………………..

Keyboard doesn’t work after logging in to Windows

Symptoms

Keyboard stops working after I log in to Windows.

Cause

Windows misconfiguration: Filter keys are turned on.

Resolution

  • Start your Windows virtual machine.
  • Go to Start > Control Panel > Ease of Access.
  • Click on the Make the keyboard easier to use link.
  • Scroll down to the Make it easier to type section.
  • Clear the turn on Filter keys checkbox.

Hopes it will works Done…………….

Thank you…………….

Solidwork 2017 Service Pack Installation Error Solving Solution

Error 1723. There is a Problem with this Windows Installer package.

Solution:

This is a fairly common permissions issue occurring with MSI installers. To resolve the problem:

  1. Navigate to c:\users\”username”\App Data\Local\  (make sure to change “User Name” to your Windows user name).
  2. Right click on “temp” and choose “properties.”
  3. Choose security –> edit –> add, and add the username you are using, and give yourself all rights/permissions.
  4. If the issue persists, give rebooting your machine a try.

Definitely it Will working Done You Can Install The Installer Package……..

Pendrive Not Detected, But Showing in Disk Management (Change GPT to MBR) File System

 Convert GPT to MBR

If the first method doesn’t help too much, converting GPT to MBR disk can do you a great favor. It is an easier way to fix “The Selected Disk is the GPT Partition Style” error. And you can do it by using Diskpart or EaseUS free partition software. The latter one is a better choice because it allows you to manage this job without deleting partitions or losing data. 

Method 1: Convert to MBR using Diskpart

Step 1: Press “Win + R” to open Run dialog > Type: cmd and hit “Enter” to bring up Command Prompt.

Step 2: Type: diskpart.exe and hit “Enter” to open “DiskPart” window.

Step 3: Type: list disk and hit “Enter”.

Step 4: Type: select disk g (Replace g with the drive letter or your disk that you want to change it to MBR.)

Step 5: Type: convert MBR and hit “Enter”. Let the program to do the disk conversion task, and then there you’ll get wanted partition table in your disk

Step 6: Type: exit to finish the task.

If The step not workout you try another option :

You can’t Delete any partition or volume it shows below the service error No Worry

Try Another way

Resolving the Error Using the override parameter

Most likely, you are seeing this error as a warning that you need to be extra sure that you wish to delete the recovery partition. It’s somewhat confusing because the parameter is not indicated in the Help Delete Partitionsection of DiskPart.

Press Windows key + R to open up a Run dialog box. Then, type “diskpart” and press Enter to open the DiskPart utility. When prompted by the UAC (User Account Control), click Yes to grant administrative privileges.

Identify the disk that you want to work with by typing the following command:

list disk

Select the list that you want to wipe or reformat by using the following command:

select disk X
  1. Note: X is only a placeholder for the actual number of the disk that you’re trying to handle. Please replace the placeholder with the correct number.
  2. Once the proper disk is selected, type the following command to see all the partitions that the selected drive is using
list partition

From the list of partitions, identify the one that you wish to delete and use the following command to select it:

select partition X

With the targeted partition selected, use the following command do signal Windows that you’re sure about the step that you’re about to perform (by using the override parameter):

delete partition override

Once the process completes successfully, type the following command to exit Diskpart:

exit

Definitely Working The Command

And Finally Detect The Pendrive dam Sure

…………………………………………………………Thank You……………………………………………………

Disable access to USB ports, so that no one can steal data through USB from your PC

Do You want to protect your data so that no one can take it  out from your PC via a pen drive, Then here are steps to block usb ports. You can reenable whenever you want.

1. In search box search RUN. You can also press windows key + r.
2. Now, type regedit in it to open registry editor.
3. Once it browse to the follwoing location given in next step
4. HKEY_LOCAL_MACHINE\SYSTEM\CurrentControlSet\Services\usbstor
5. In the right area, double click on Start.
6. In the Value Data box, change the value to 4.
7. Finally Click on OK.
8. Close Registry Editor and restart your PC.
9. To re-enable access to your USB ports, enter 3 in the Value Data box in Step 6.

Thank You

This Copy of Windows Is Not Genuine 7600/7601 Fix (2 Helpful Ways)

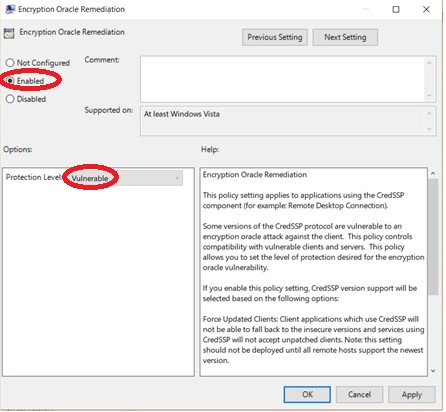
①Uninstall KB971033 Update

Perhaps your Windows was running without any trouble until Windows 7 KB971033 update was installed. This update includes Windows Activation Technologies that help detect your Windows operating system.

Once it finds out the copy of Windows is not genuine, you may receive a message on the lower right part of the desktop stating “Windows 7 build 7601 this copy of Windows is not genuine”.

Hence, you can choose to uninstall this update to remove Windows 7 genuine notification build 7601/7600.

Uninstall Windows 7 KB971033 update

Since the computer has now been backed up, you can uninstall the Windows update to fix “this copy of Windows is not genuine build 7600/7601”.

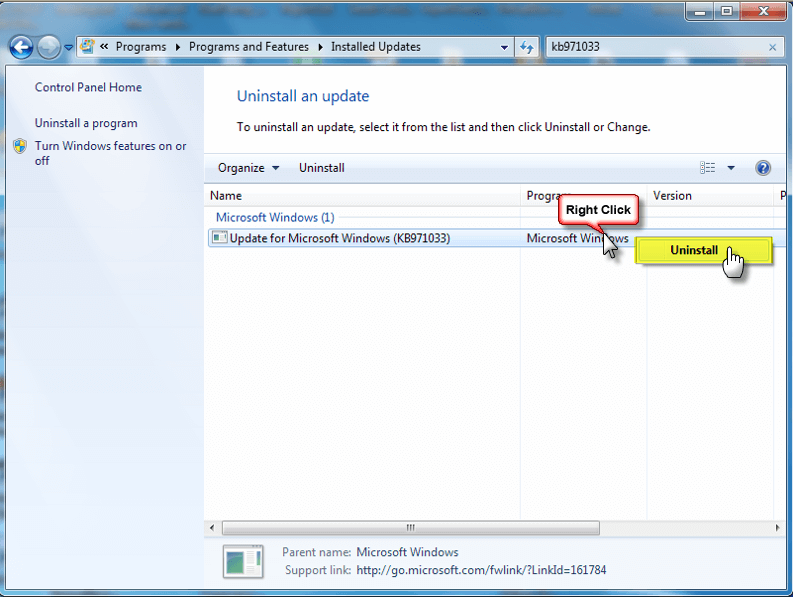
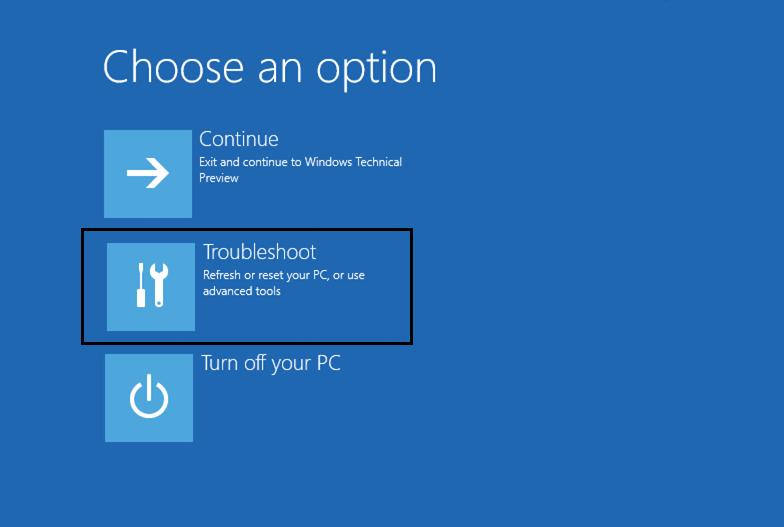
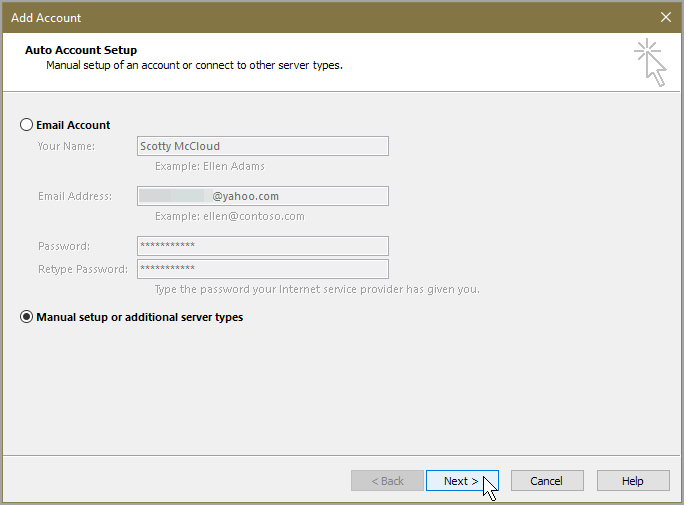
  1. Click the Start button, and open Control Panel window.
  2. Choose the System and Security section.
  3. Go to Windows Update part, and click View installed updates option. Or click on View update history and hit the Installed Updates link at the top.
  4. Find the update of KB971033 and right-click on it to choose Uninstall button.

After completing the update, Windows 7 not genuine issue should be solved. If the message still exists, try the following method.

②Using SLMGR -REARM Command

In Windows, there is a built-in Windows 7 not genuine removal tool you can use to make Windows 7 genuine. 

SLMGR, short for Windows Server License Manager Script, is the command prompt version of Microsoft licensing tool. And REARM command will help reset the licensing status of your machine.

Now, you can use SLMGR -REARM command to remove “this copy of Windows is not genuine 7601/7600 issue”.

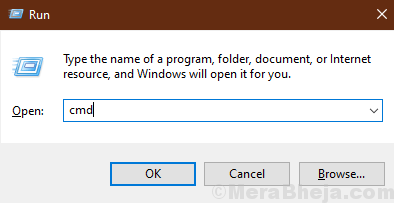
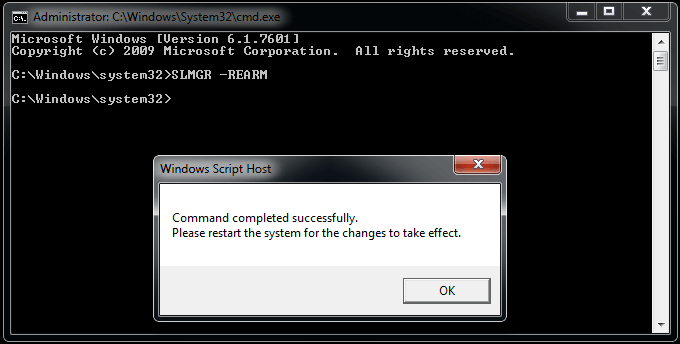
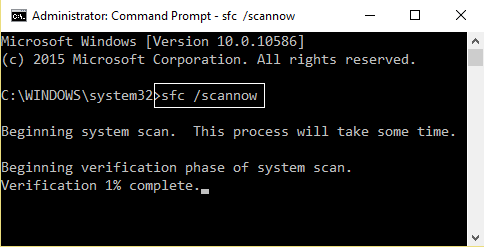
  1. Go to Start menu and search for Command Prompt. Right-click on cmd.exe in the search result and choose Run as Administrator.
  2. Type SLMGR -REARM command in the pop-up window, and press Enter.
  3. A pop-out window shows that your command has completed successfully and requires you to restart the system. Click OK to let all changes take effect. 

You can choose to reactivate it every 30 days for 3 times. That is, you essentially get 120 days for this version of Windows.

To break the limit, here is what you can do:

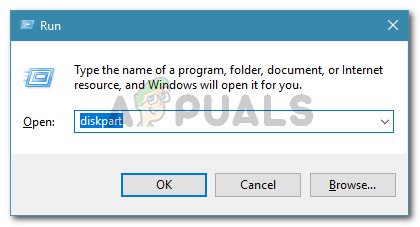
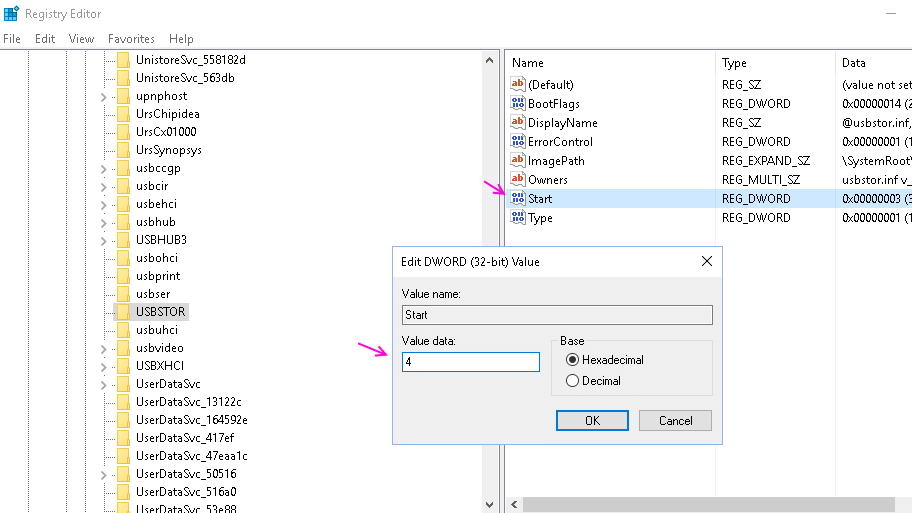
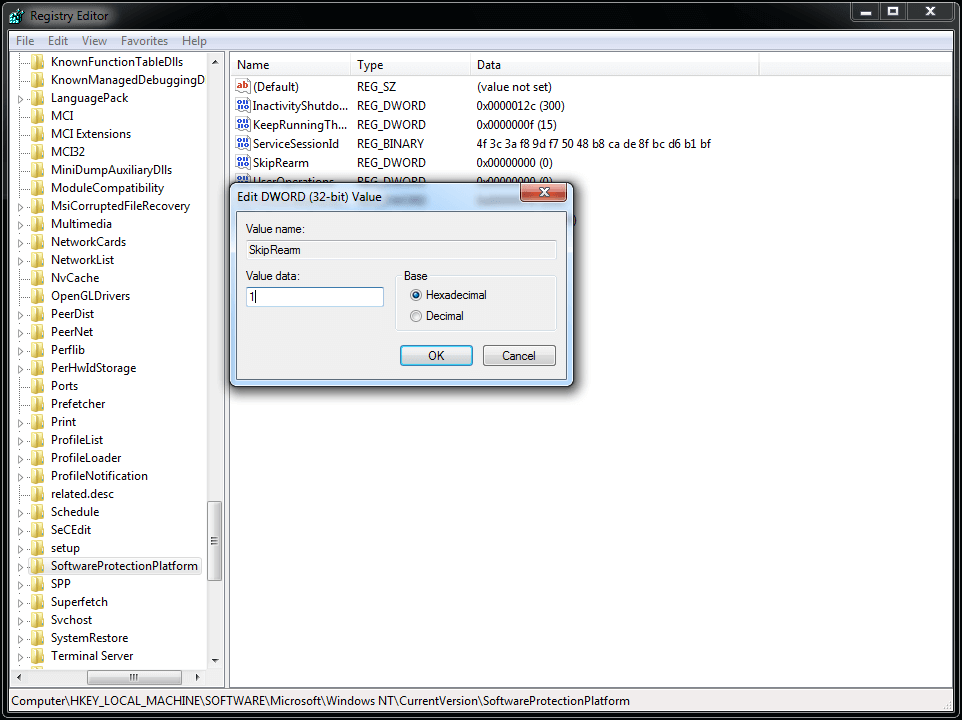
  1. Open the Run window by hitting Win + R keys, input regedit.exe in the text box and press Enter to open Registry Editor
  2. Navigate to HKEY_LOCAL_MACHINE > Software > Microsoft > WindowsNT > Current version > SoftwareProtectionPlatform.
  3. Find SkipRearm and right-click it to choose Modify.
  4. Change the value from 0 to 1.
  5. Restart your computer.

You can now use the slmgr -rearm command for another 8 times, which is another 240 days. In total, you will get free Windows 7 for 120 + 240 = 360 days.

slmgr is not recognized as an internal or external command – How to fix

If you want to convert not genuine windows to genuine, you need to read This copy of windows is not genuine: easy solution.

While using command “SLMGR -REARM” mentioned in above article, you may get error “slmgr is not recognized as an internal or external command“. Or any other error same as above error message.

There are lot’s of reasons for this error. This article may cover all the reasons and their solutions. Exclusive Gift: Want to read this article offline? Click Here to Download Our Free EBook Which gives you Simple fix  for Windows (7 & XP) Not genuine Errors.

1. Reason : There might be spelling mistake.

Solution : Make sure there is a space between “SLMGR” and “-REARM”.

2. Reason : You might not opened Command Prompt as Administrator.

Solution : Right click on “CMD” and select “Run as Administrator”.

3. Just try “SLMGR /REARM” instead “SLMGR -REARM”.

4. Open Command Prompt as Administrator.
type cd \ and press enter.
type cd windows\system32 and press enter.
Now you will see C:\windows\system32>. Now use command like this C:\windows\system32>SLMGR -REARM

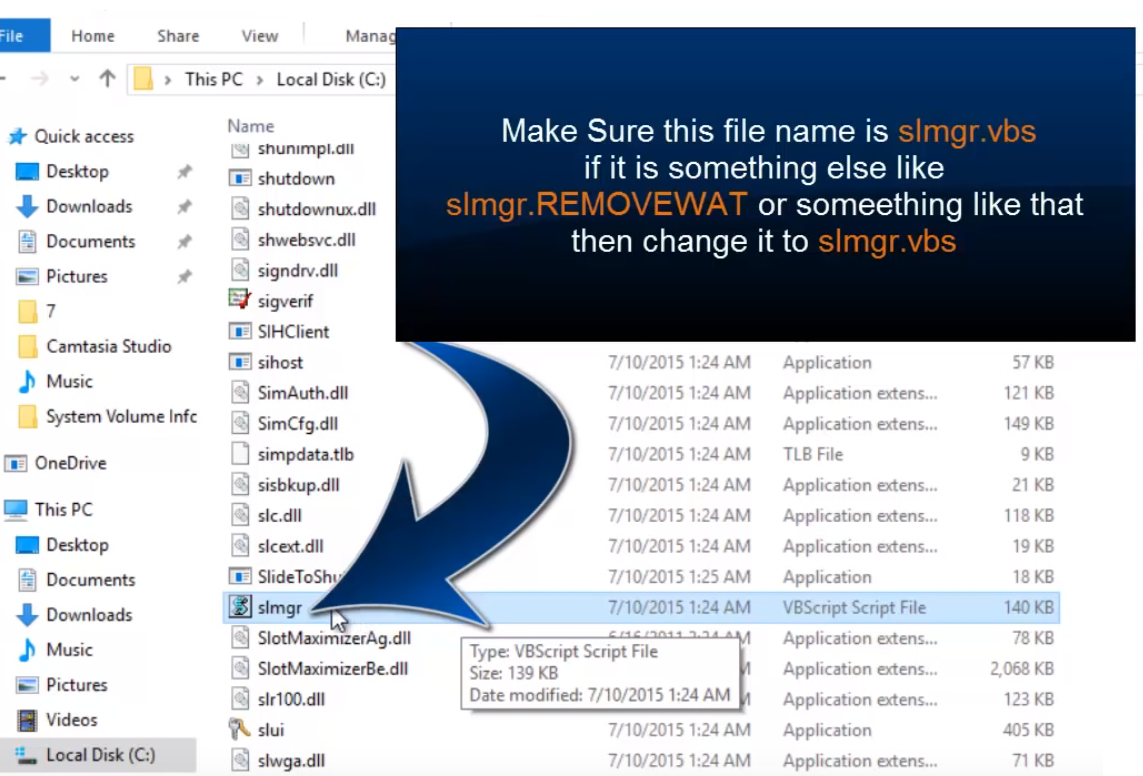
5. Reason:  slmgr.vbs file might have any other extension. You need to remove the extension by renaming the file.

Solution: Go to My computer

Go to “C” drive.

Select folder “Windows”.

Select folder “System32”.

Scroll down until “slmgr.vbs.REMOVEWAT”. Right-click on it and rename it to “slmgr.vbs”. If you don’t find “REMOVEWAT” extension, remove any other extension at the end of slmgr.vbs.

Then Again Run The Command And Restart The System And Run the Windows Activator. Finally you get better result.

Final Word

When you follow above methods properly, you will not see any error in the future. You can use your OS forever but without updates.

Remember, Always hackers attack older versions of OS and software on your computer to place malware and to hack your details. I always recommend you to use the latest versions of OS and any software.


……………………………………………….Thank you……………………………………..

Whenever you run SFC (System File Checker) the process stops in the middle and gives you this error” Windows Resource Protection could not perform the requested operation”

Why the error Windows Resource Protection could not perform the requested operation occurs when running SFC command?

-Damaged, corrupt, or missing files
-SFC cannot access winsxs folder
-Damaged Hard disk partition
-Corrupted Windows files
-Wrong System Architecture

Table of Contents

Method 1: Run Windows Check Disk

1.Press Windows Key + X and select Command Prompt(Admin).

2.Type the following command in cmd and hit enter:

CHKDSK C: /R

3.Next, it would ask to schedule the scan when the system restarts, so type Y and hit enter.

4.Restart your PC and wait for the Check Disk Scan to finish.

Note: CHKDSK may take some time to complete depending upon the size of your hard disk.

Method 2: Modify Security Descriptors

In most of the cases the error occurs because the SFC cannot access winsxs folder, so you have to manually modify the security descriptors of this folder in order to Fix Windows Resource Protection could not perform the requested operation error.

1.Press Windows Key + X and select Command Prompt (Admin).

2.Type the following command in cmd and hit enter:

ICACLS C:\Windows\winsxs


3.Close the command prompt and restart your PC.

Method 3: Run DISM commands

1.Press Windows Key + X and select Command Prompt(Admin).


2.Type the following command in cmd and hit enter after each one:

a) Dism /Online /Cleanup-Image /CheckHealth 
b) Dism /Online /Cleanup-Image /ScanHealth
c) Dism /Online /Cleanup-Image /RestoreHealth


3. Wait till DISM process finishes then reboot your PC and see if you’re able to Fix Windows Resource Protection could not perform the requested operation error. 

Method 4: Run startup/Automatic Repair

1.Insert the Windows 10 bootable installation DVD and restart your PC.

2.When prompted to Press any key to boot from CD or DVD, press any key to continue.

3. Select your language preferences, and click Next. Click Repair your computer in the bottom-left.


4. On choose an option screen, click Troubleshoot.

5. On Troubleshoot screen, click Advanced option.


6. On the Advanced options screen, click Automatic Repair or Startup Repair.

7.Wait til the Windows Automatic/Startup Repairs complete.

8.Restart and you have successfully Fix Windows Resource Protection could not perform the requested operation, if not, continue.

……………………………………………Thank You…………………………………………

UNEXPECTED STORE EXCEPTION Error on Windows 10


1. Update your display driver

2. Run SFC & DISM

Now, type in the following command,

sfc /scannow

Hit Enter.

Finally, Restart your computer for the changes to take effect.

3. Turn off Fast Start-up

Hit the WINKEY + R button combinations, type in Control and hit Enter to launch the Control Panel. Then search for Power Options on the top right search field given to you and find it.

On the left panel, click on Choose what the power buttons do.

On the next page, click on Change settings that are currently unavailable.


Uncheck Turn on Fast Start-up (Recommended). Reboot your computer for the changes to take effect.

4. Turning off Sleep Mode

Another fix which worked for the majority of the users was disabling sleep mode. The error seems to be related to the computer sleeping or saving predefined data (as in fast startup). We can try disabling the sleep mode completely and check if this fixes the problem. Do note that if this doesn’t make a difference, you can always revert the changes.

  1. Right click on the battery icon present at the bottom right of your screen and click “Power Options”.

If you own a PC and don’t see this option, press Windows + S and type “choose a power plan”. Click on the most relevant result.


  1. There will be many plans listed in the window. Click on “Change plan settings” in front of the power plan which is currently active on your computer.
  1. On this window, you will see an option “Put the computer to sleep”. Make sure that the option is set to as “Never” in both conditions (on battery and plugged in). Click “Save changes” and exit.
  1. Now reboot your computer and check if the problem went away.

5. Check for Windows Updates

1) Type Windows Update in the search box. Click Check for updates on the top result.

2) Click Check for updates on the right pane of pop-up window.

Go on to follow the on-screen instructions to install the updates.

That’s all there is to it.

Your any comment or feedback is welcomed coming below, thanks.

6. Miscellaneous fixes

You may run the following command in CMD as well:

chkdsk /f /r

You can also try disabling your antivirus program. McAfee Antivirus has majorly been found the culprit in this issue. So, I would really recommend you to uninstall your third-party antivirus program.

To do this, open Control Panel. Click on Uninstall a Program. From the whole populated list your installed software, select your Antivirus program. Right-click on the entry and click on Uninstall. Follow the onscreen prompts.

Reboot your computer for the changes to take effect.

……………………………………..Thank You………………………………..